Tutorial 1: Your first Rapture Reflex Project.
This tutorial will cover uploading files, translating into documents, updating series data, and running reports using Rapture platforms scripting language Reflex.
Options for running Reflex
Running this tutorial requires access to a running Rapture instance. See Rapture Getting Started Guide
Reflex is a scripting language, and as such requires an interpreter. There are three ways to execute scripts:
RIM demo environment: Script Execution Window
RIM Script Page
Click here to find out about Script windowRIM demo environment: Reflex REPL Window
RIM REPL Page
Click here to find out about REPL windowRIM comes with a REPL page for Reflex scripts.
Login and click on the >_ icon.
This will bring up the Reflex REPL window; users can type commands directly into the browser and they will be executed immediately.
Local: ReflexRunner client utility
Use of ReflexRunner
Click here to find out about ReflexRunner appThe tutorial bundle includes ReflexRunner, a Java interpreter that will read and execute a reflex script from a file. This document will focus on running the tutorial scripts using ReflexRunner.
Connecting to Rapture: To log in to the Rapture environment via ReflexRunner the user must specify a user name, a password and the location (URL) of the Rapture instance to connect to. This can be done using command line options or environmental variables.
The tutorial includes a script called $RAPTURE_HOME/Setup/rapture.sh - if this script has already been executed then the following environmental variables will have been set and the command line options will not be needed. For reference:
The environment can be specified using the -r option, or by setting the RAPTURE_HOME environmental variable. In most cases this will take the form http://envname.incapture.net:8665/rapture
The username can be entered manually or specified with the -u option, or by setting the RAPTURE_USER environmental variable. Typically all users will have their own personal accounts; there is also a common 'rapture' account.
The password can also be entered manually or specified with the -p option, or by setting the RAPTURE_PASSWORD environmental variable. Obviously in a real world instance for security purposes manual entry is recommended, but for the purposes of a tutorial this is supported.
Executing a script: The script must be specified using the -f option; there is no command line or environmental alternative. So to run the App.rfx script using the default options:
$ ReflexRunner -f App.rfx
This document will focus on running the tutorial scripts using ReflexRunner.
Before beginning this demonstration of Rapture it is expected that your environment satisfies the following pre-requisites
- Java 8 (or later) runtime is installed and accessible
Reflex
Reflex is a scripting language developed at Incapture Technologies. It is designed for performing cloud-based data manipulation. Reflex takes very little resource overhead, and therefore handles the data interactions more efficiently than JRuby, Jython, or any other standard scripting tool. We will demonstrate how to perform various operations using Reflex; for those interested in learning more, please check out the Reflex Language Reference.
1. Create new Repositories to store the data.
The first step in this tutorial is to login to your RIM instance and create the data repositories.
Process | ||
---|---|---|
Login to your demo environment using url and credentials provided during signup | ||
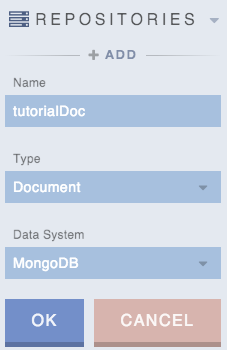
Create a Document repository using RIM's + Add Repositories interface:
| ||
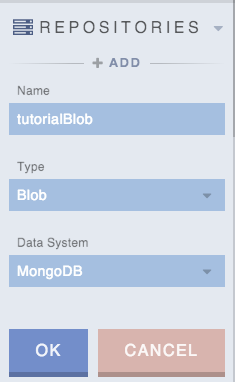
if not already added create a Blob repository again using RIM's + Add Repositories interface:
| ||
With the two repositories in place we are ready to move onto the next step in the tutorial: upload a CSV file. |
Under the Hood
SERIES_AUTHORITY="datacapture"; BLOB_AUTHORITY="tutorialBlob"; DOC_AUTHORITY="tutorialDoc"; BLOB_URI="blob://"+BLOB_AUTHORITY; DOC_URI="document://"+DOC_AUTHORITY; SERIES_URI="series://"+SERIES_AUTHORITY; if (!#blob.blobRepoExists(BLOB_URI)) do #blob.createBlobRepo(BLOB_URI, "BLOB {} USING MONGODB {prefix=\""+BLOB_AUTHORITY+"\" }", "REP {} USING MONGODB { prefix=\""+BLOB_AUTHORITY+"\"}"); end if (!#doc.docRepoExists(DOC_URI)) do #doc.createDocRepo(DOC_URI, "REP {} USING MONGODB {prefix=\""+DOC_AUTHORITY+"\"}"); end if (!#series.seriesRepoExists(SERIES_URI)) do #series.createSeriesRepo(SERIES_URI, "SREP {} USING MONGODB {prefix=\""+SERIES_AUTHORITY+"\"}"); end
2. Capture Data – Load a CSV
In folder $RAPTURE_HOME/Intro01/Reflex/src/main run the script Upload.rfx using ReflexRunner
$ cd $RAPTURE_HOME/Intro01/Reflex/src/main
$ ReflexRunner -f Upload.rfx
Under the Hood
The script will attempt to read a data file and store it in the blob repository.
The accompanying data file introDataInbound.csv should be in the current working directory.
To read a different file, or to read from a different directory, set the environmental variable RAPTURE_TUTORIAL_CSV appropriately.
When using the REPL window or Script UI, Reflex cannot access the local file system. In order to upload data into Rapture a blob uploader is available from the user interface. To use this, create a Blob repository using the [+] icon at the top level if one does not already exist. Then select the repository using the Content Browser and select the [+] icon to upload a blob.
TBD if Script UI will be ready.
The following Reflex code defines a file with name CSV_FILE.
The file operation may take additional parameters to indicate the file type; these include
- CSV - Comma separated values. Each line is a series of values separated by a delimiter. The default delimiter is a comma; an alternate delimiter can be specified as a further argument. The data will be returned as a list of lists.
- CSVHEADER - Comma separated values with separate header. In this case the first line is treated as a list of column headers and kept separate from the rest of the data. As with CSV a different delimiter can be specified. The data will be returned as a list of maps
- JSONDOC - The data is a single JSON formatted document. The data will be returned as a single map.
- JSONARRAY - The data is a list of JSON formatted documents, one per line. The data will be returned as a list of maps.
Unrecognized data types will be stored with the mine-type text/plain.
The --> operator, known as "push", takes the data from the file and inserts it directly into the Blob Repository.
The blob metadata will hold the type information as well as the time and identity of the uploader.
CSV_FILE = ENV.RAPTURE_TUTORIAL_CSV; if (CSV_FILE == null) do CSV_FILE = "introDataInbound.csv"; println("No CSV specified. Defaulting to "+CSV_FILE); end rawCsvUri = BLOB_URI+"/"+CSV_FILE; if (!#blob.blobExists(rawCsvUri)) do println("Reading CSV from file " + CSV_FILE); file(CSV_FILE, "CSV") --> rawCsvUri; println("CSV uploaded to "+ rawCsvUri); else do println("Data has already been uploaded to the BLOB repository."); end println("\nDone\n");
At this point we have uploaded the CSV file into the blob://tutorialBlob repository.
Look at the Upload.rfx() in the RaptureTutorials project to see the API calls used.
Look at the RIM interface to see the blob you uploaded:
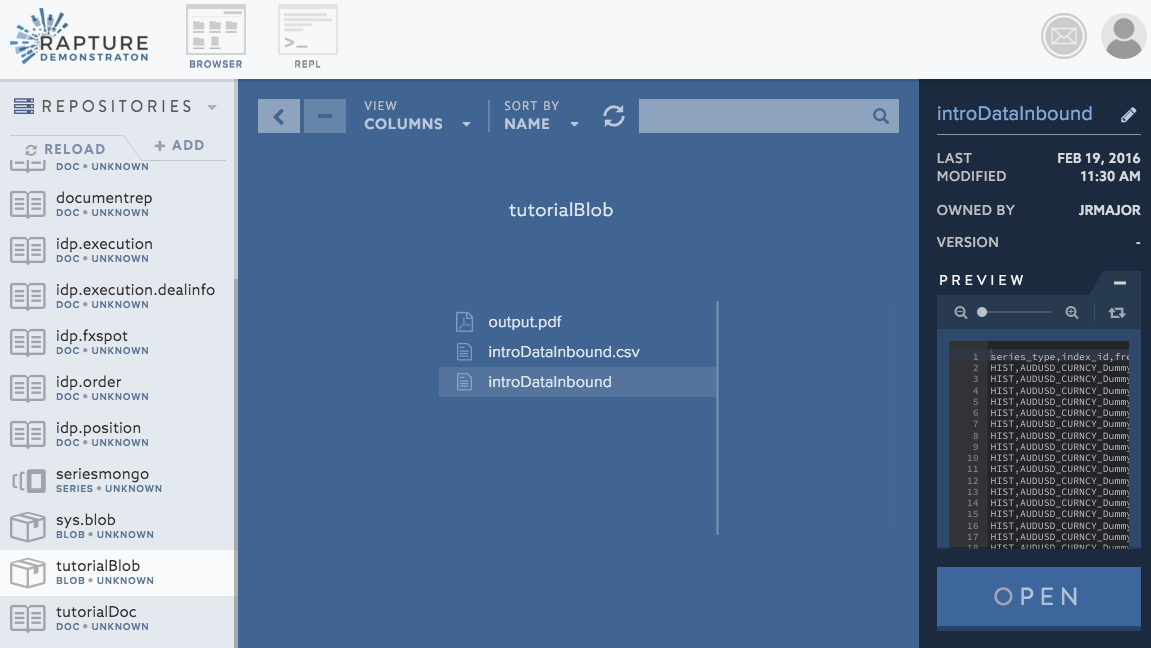
Next up we will run code to translate the CSV file (in the blob repo) to a document (in the document repo).
In this step
Run upload script to load CSV into Blob
View Blob
Reflex
Windows users
Use %RAPTURE_HOME% if needed
3. Translate Data – Create documents from raw Data
Again in the same folder $RAPTURE_HOME/Intro01/Reflex/src/main run the script BlobToDoc.rfx
$ ReflexRunner -f BlobToDoc.rfx
Under the Hood
Having loaded the data into Rapture the next step is to convert it into a usable format.
One option is to use the Pull operator which will interpret the data according to its metadata type. In the case of a CSV, Reflex will split the data into a List of Lists.
data <-- rawCsvUri;
Another option is to open the blob using the file command and read it as raw text, one line at a time, then parse it accordingly. The split command will break each line into individual columns based on the separator string; the boolean argument indicates whether to ignore the separator if it occurs within quotation marks.
When using file to read a blob it is not necessary to specify the file type since this information is already stored as metadata. However the information can be supplied or overridden if so desired.
data = []; for datum in file(rawCsvUri) do if datum == null do println("Nothing found at " + rawCsvUri + ". Please run step 'upload' to add the CSV to Rapture."); // Reflex doesn't have an exit operation but assert(false) is the nearest thing. assert(false); end data.add(split(datum, ",", true)); end
Having read the data, process it. In this instance the last column needs to be converted from a string to a number using the cast operation, and the date column has hyphens which must be removed using the replace operation.
headers = data[0]; noheaders = data.subList(1, data.size()); for datum in noheaders do siz = datum.size(); if (siz >= 2) do key = datum[siz -2]; datum[siz -2] = replace(key,"-",""); datum[siz -1] = cast(datum[siz -1], 'number'); end end
The data can now be written to the Document repository. In Rapture a Document must be a JSON formatted Map.
Since the data is in a List of Lists it will need to be converted to a Map. Pushing the List data to the Document repository will automatically convert the data to a nested Map of Maps - every unique entry in the first column will become a Key and the remaining columns will become values. The data can thereafter be pulled from the document repository as a Map.
noheaders --> DOC_URI+"/introDataTranslated";
Alternatively the data can be written in an application-specific format, as long as it is a JSON compliant map. For this tutorial a format has been defined as described in the main document.
dataMap = {}; indexMap = {}; firstEntry = noheaders[0]; for k in [ 0,1,3 ] do key = headers[k]; val = firstEntry[k]; dataMap[key] = val; end key = headers[2]; dataMap[key] = indexMap; for datum in noheaders do if (size(datum) > 4) do index = datum[2]; priceType = datum[4]; indexValMap = indexMap[index]; if (indexValMap == null) do indexValMap = {}; indexMap[index] = indexValMap; end priceTypeMap = indexValMap[priceType]; if (priceTypeMap == null) do priceTypeMap = {}; indexValMap[priceType] = priceTypeMap; end datestr = datum[5]; val = cast(datum[6], 'number'); priceTypeMap[datestr] = val; end end #doc.putDoc(DOC_URI+"/introDataTranslated", json(dataMap));
At this point the CSV (blob) data has been converted into a document type, which is in this repository: document://tutorialDoc/introDataTranslated
Look at the BlobToDoc.rfx() in the RaptureTutorials project to see the API calls used.
Look at the RIM interface to see the document you created.
Next up we will look at creating series data from the document.
In this step
Run translate script to create Doc
View Doc
Windows users
Use %RAPTURE_HOME% if needed
4. Analyze Data – Update series Data from documents
Again in the same folder $RAPTURE_HOME/Intro01/Reflex/src/main run the script DocToSeries.rfx:
$ ReflexRunner -f DocToSeries.rfx
Under the Hood
The data can be pulled from the Document Repository as a Map or read as a JSON String and converted to a Map using the fromjson operator:
data <-- DOC_URI+"/introDataTranslated"; // or docStr = #doc.getDoc(DOC_URI+"/introDataTranslated"); data = fromjson(docStr);
And of course the original list can be rebuilt
csv = [ ] ; indexes = docMap.index_id; for i in keys(indexes) do index = indexes[i]; for prices in keys(index) do priceMap = index[prices]; for dateVal in keys(priceMap) do row = []; row.add(docMap.series_type); row.add(docMap.provider); row.add(i); row.add(docMap.frequency); row.add(prices); row.add(dateVal); row.add(priceMap[dateVal]); csv.add(row); end end end
The data can also be written to a Series. If it is already in the correct format it can simply be pushed to the Series repository:
csv --> SERIES_URI; // This is equivalent to for line in csv.subList(1, size(csv)) do location = SERIES_URI; columns = size(line); if (columns >= 2) do for field in line do if (columns == 1) do value = field; else if (columns == 2) do key = field; else do location = location+"/"+field; end columns = columns - 1; end #series.addDoubleToSeries(location, key, value); else do println("Line has less than 2 values: it will be skipped"); end end
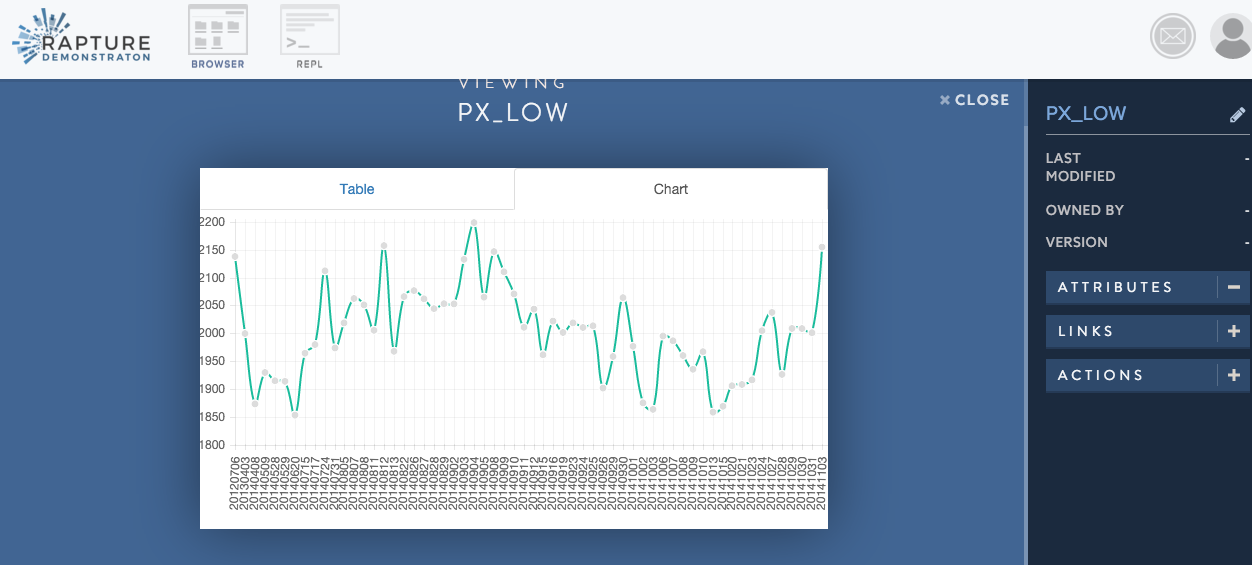
At this point a a series has been created using data from document://tutorialDoc/introDataTranslated.
Look at the DocToSeries.rfx() in the RaptureTutorials project to see the API calls used.
Your data has now been stored in Rapture Information Manager in three forms: raw CSV, JSON document, and series data.
You can view the series on the RIM web interface.
Next we will create a pdf from the series repository.
In this step
Run analyze script to create/update Series
View Series
Windows users
Use %RAPTURE_HOME% if needed
5. Distribute Data – create reports from series Data
This step will produce a pdf from the series data. The pdf is saved to your local directory and also the Rapture Instance.
$ cd $RAPTURE_HOME/Intro01/Java/ReportApp/build/install/ReportApp/bin
$ ./ReportApp
Look at the ReportApp code in RaptureTutorials project.
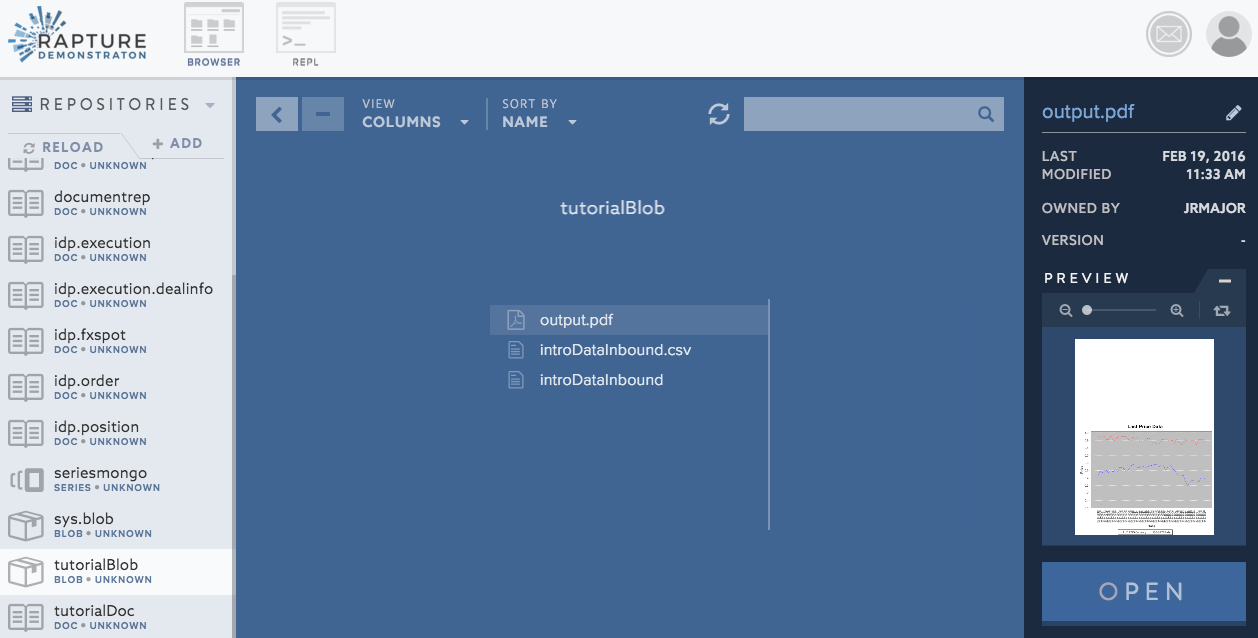
You can look at the pdf on the RIM interface at this url blob://tutorialBlob/output.pdf
In this step
Run report step to create PDF
View PDF and Blob
Windows users
A batch file is provided: Report.bat
Use %RAPTURE_HOME% if needed
6. Reset Data (Optional)
Reset data
Follow these steps to reset your demo environment.
- Using RIM, go to Scripts/Tutorial01/tutorialCleanup.rfx and click open.
- Execute the script using the "Run Script" button